

How to Grade Extended Size Patterns: A Technical Guide
Table of Contents
- What Is Pattern Grading and Why Extended Sizes Matter
- The Foundation: Understanding Your Base Block and Sloper
- Plus Size Pattern Grading Techniques: Beyond Simple Scaling
- How to Grade a Sewing Pattern Up: The Step-by-Step Process
- Fit Testing for Extended Sizes: Validating Your Graded Patterns
- Digital vs. Manual Grading Workflows
- The Role of Wearing Ease in Extended Size Grading
- Common Mistakes to Avoid When Grading Extended Sizes
Last Updated: August 21, 2026
What Is Pattern Grading and Why Extended Sizes Matter
Pattern grading is the systematic process of increasing or decreasing a sewing pattern across multiple sizes while maintaining the garment's fit and silhouette. Real grading requires understanding how bodies change proportionally across size ranges, not simply scaling uniformly. Properly-graded extended sizes fit dramatically better than poorly-scaled counterparts because they account for proportional adjustments to armholes, necklines, dart placement, and body length that simple percentage increases can't achieve.
The Foundation: Understanding Your Base Block and Sloper
Your base block (also called a sloper) is the foundation of everything, a perfectly-fitted, minimal-seam pattern piece representing your size 0 or 1, the baseline from which all other sizes flow. Without a solid base block, every size you grade from it will compound errors.
Building an accurate base block requires precise body measurements: shoulder width, armhole depth, bust circumference, waist position, hip width, and total body length (the American Academy of Dermatology). The sloper should have minimal design details, no seams you don't need, no darts except where essential for fit. Once you have a base block that fits flawlessly, you can grade with confidence knowing that proportional changes will maintain fit across your entire size range.
Plus Size Pattern Grading Techniques: Beyond Simple Scaling
Proportional Adjustment vs. Uniform Grading
Uniform grading means adding the same amount to every measurement across every size. Proportional adjustment means understanding that bodies don't grow uniformly, shoulders don't widen as much as hips, armholes don't deepen proportionally, and sleeve length doesn't change at the same rate as body length (peer-reviewed research).
When you grade uniformly, you're treating a size 2XL like it's just a bigger version of a size S. But a size 2XL typically has proportionally wider hips relative to shoulder width than a size S. The bust-to-waist ratio changes. The armhole depth needs adjustment. Proportional grading accounts for these shifts by creating grade rules that vary by measurement type, producing extended sizes that actually fit like they were designed for those bodies.
Grade Rules and Mathematical Formulas
Grade rules are mathematical formulas that dictate how much each measurement increases from one size to the next. A well-designed grade rule table specifies increments for bust, waist, hip, armhole depth, neckline width, sleeve length, and torso length. Each measurement gets its own rule because they don't all scale at the same rate.
If your base size is 8 and your grade increment for bust is 1 inch per size, then size 10 gets 1 inch added, size 12 gets 2 inches added, and so on. But your armhole depth might only increase 0.25 inches per size because armholes don't need to deepen as dramatically as bust circumference increases. The grade increment from size 2XL to 3XL might differ from the increment between sizes 6 and 8 because bodies in extended sizes often have different proportional relationships than bodies in standard sizes.
How to Grade a Sewing Pattern Up: The Step-by-Step Process
Step 1: Measure Your Base Block Accurately
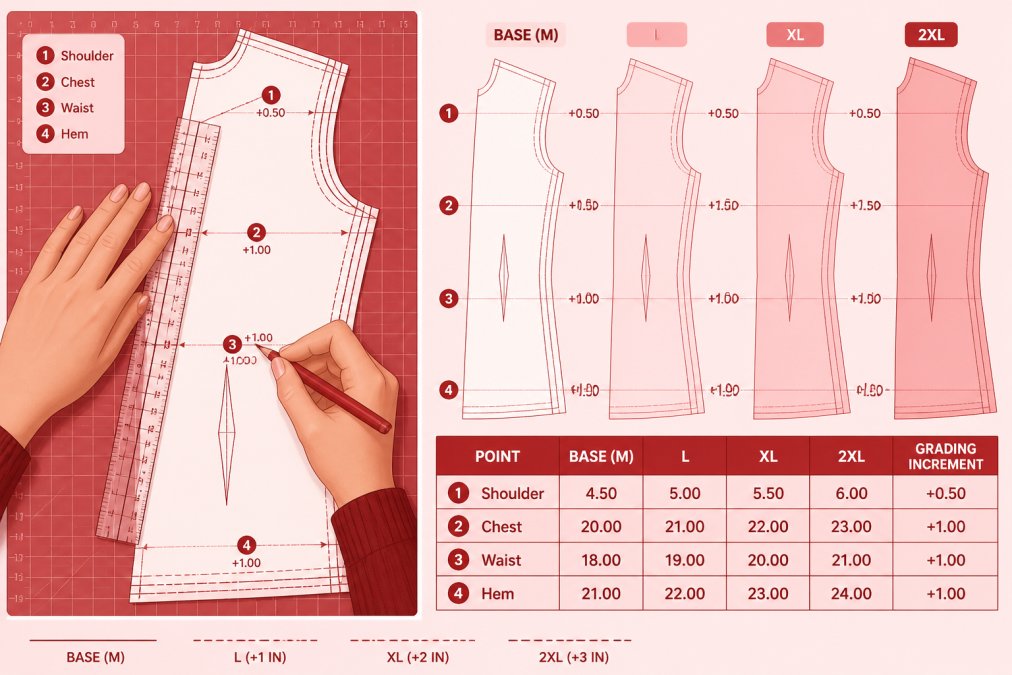
Start by measuring every dimension of your base block with precision to the quarter-inch. Measure horizontally: shoulder width, armhole width, bust at the fullest point, waist, and hip. Measure vertically: shoulder to underarm, underarm to waist, waist to hip, hip to hem, and total body length. Document everything in a spreadsheet with columns for each measurement type and rows for each size.
Step 2: Calculate Grade Increments for Each Size
Once you have your base measurements, calculate what each measurement should be for every size in your range. If your grade rule says bust increases by 1 inch per size and your base size 8 has a 36-inch bust, then size 10 = 37 inches, size 12 = 38 inches, and so on. For extended sizes, you might deviate from your standard-size grade rules by increasing bust by 1.25 inches instead of 1 inch because extended-size bodies often have proportionally larger increases. Test your calculations by checking proportional relationships.
Step 3: Adjust Armholes, Necklines, and Dart Manipulation
Armholes require technical adjustment. You're not just making the armhole bigger; you're adjusting its curve, depth, and width proportionally. When you grade an armhole up, you typically increase the depth slightly less than you increase the width. Necklines follow similar logic, a neckline that looks proportional on a size 6 looks too small on a size 2XL if you just scale it uniformly.
Dart manipulation is crucial for extended sizes. As you grade up, darts need to move and adjust because the body's proportions have shifted. A dart that sits perfectly at size 8 might be in the wrong position at size 2XL. You may need to relocate darts, adjust their depth, or add additional darts in extended sizes to maintain proper shaping.
Step 4: Handle Body Length and Proportion Changes
Body length changes aren't uniform across sizes. You might increase total body length by 1 inch per size in standard sizes but 1.25 inches per size in extended sizes because extended-size bodies often have proportionally longer torsos. Proportion adjustments also affect where design details land. Consider wearing ease in your calculations, extended sizes often need more wearing ease than standard sizes to maintain the same comfort level.
Fit Testing for Extended Sizes: Validating Your Graded Patterns
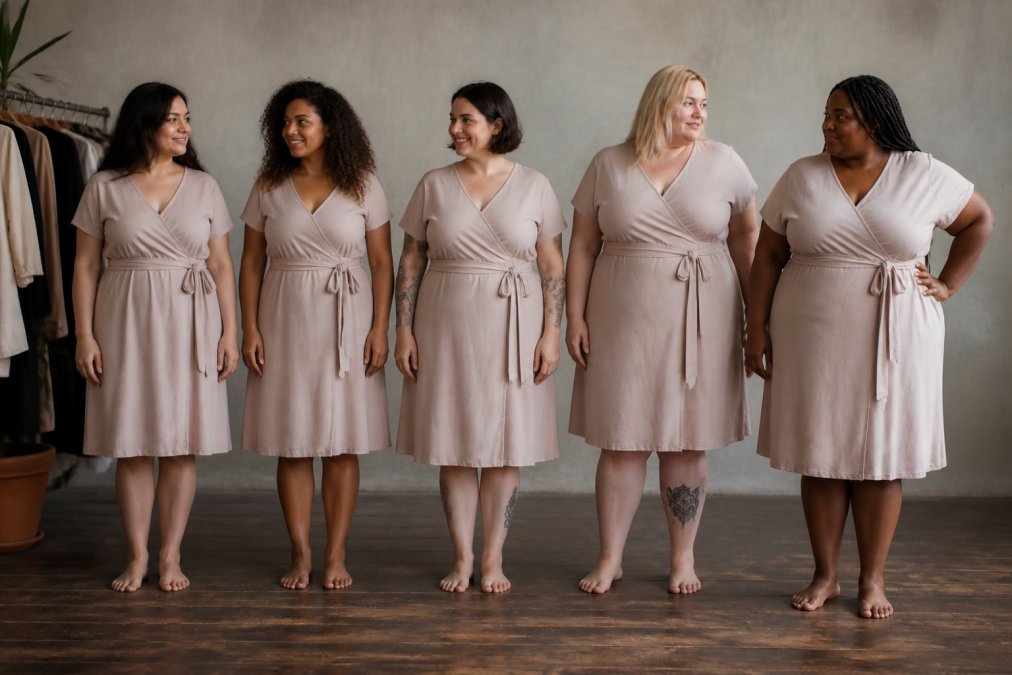
Fit testing is non-negotiable. Create a muslin prototype for at least one size in each size cluster: one in standard sizes, one in plus sizes, and one in extended sizes if you're grading that far. Have actual fit models try on the muslins and watch how the garment moves. Use fit testing feedback to adjust your grade rules. This iterative process, grade, test, adjust, test again, is how you develop grading systems that actually work.
Digital vs. Manual Grading Workflows
Manual grading means drafting each size by hand, adjusting pattern pieces individually, and marking measurements manually. Digital grading uses specialized software that applies your grade rules automatically. Software like Gerber Accumark, Lectra Kaledo, or CLO 3D handles mathematical calculations and produces graded patterns ready for production.
The choice depends on your scale and budget. If you're grading one or two styles, manual grading might be sufficient. If you're grading dozens of styles across multiple size ranges, digital grading saves enormous amounts of time and reduces human error.
The Role of Wearing Ease in Extended Size Grading
Wearing ease is the extra space you add to a garment beyond the wearer's body measurements. Standard wearing ease guidelines suggest 0.5 to 1 inch for close-fitting garments, 1 to 2 inches for fitted garments, and 2 inches or more for loose-fitting garments (peer-reviewed research).
Extended sizes need careful ease consideration. If you add 1 inch of ease to a size 6 bust (36 inches) and the same 1 inch to a size 2XL bust (50 inches), the size 2XL has proportionally less ease. Some pattern makers adjust ease for extended sizes by adding slightly more absolute ease in larger sizes. A size 2XL might get 1.5 inches of ease instead of 1 inch.
Common Mistakes to Avoid When Grading Extended Sizes
The most common mistake is uniform scaling, adding the same percentage to every measurement across every size. Ignoring dart repositioning is another frequent error, darts that work perfectly at size 8 create unflattering folds at size 2XL because the body's proportions have shifted. Failing to test with actual fit models is perhaps the most costly mistake.
Many brands also use the same grade rules across their entire size range. Standard sizes (0-12) often have different proportional relationships than extended sizes (2XL-6XL), requiring grade rule adjustments. Another error is not accounting for body length variations or grading too aggressively, adding too much fabric in extended sizes, which creates garments that look oversized and shapeless.
Extended size grading is technical work that separates brands committed to true inclusivity from those just going through the motions. When you invest in proper grading, accurate base blocks, thoughtful grade rules, digital workflows, and rigorous fit testing, your extended sizes don't just fit; they feel intentional. Customers in 2XL and 4XL sizes experience the same quality and attention to fit as customers in standard sizes. At Hot Takes Designs, we've made this commitment because we believe everyone deserves garments that fit their body, not just their size label. View all our extended size options and see how proper grading transforms the fit experience.
Frequently Asked Questions
What is the difference between grading and resizing a pattern?
Resizing simply scales a pattern uniformly in all directions, which distorts proportions and fit. Grading uses mathematical formulas and grade rules to adjust specific measurements proportionally across a size range. When you grade extended size patterns, you account for how body proportions change at larger sizes, not just increase all dimensions equally. This ensures consistent fit and silhouette across your entire size range.
Why is grading for plus sizes more complex than standard grading?
Plus size pattern grading techniques require adjusting for different body proportions than straight grading between standard sizes. Larger bodies often have different shoulder-to-hip ratios, armhole depths, and length adjustments. You must manipulate darts differently, recalculate wearing ease, and test fit on diverse body types to ensure the garment works properly. This complexity is why professional technical designers spend significant time developing accurate grade rules for extended sizes.
How do I know if my extended size patterns fit correctly?
Fit testing for extended sizes requires creating prototypes in at least two sizes from your range and testing them on fit models with measurements matching your size chart. Check for consistent ease, proper armhole placement, balanced shoulder slope, and correct body length proportions. Common fit issues include armholes that are too tight, necklines that gap, or darts that don't align properly. Document any adjustments and apply them consistently across your entire size range.
What are grade rules and how do I create them?
Grade rules are the mathematical increments you add to each pattern piece measurement as you move up or down sizes. For example, you might add 0.5 inches to chest width and 0.375 inches to armhole depth for each size increment. Create grade rules by analyzing body measurement data across your size range, then testing prototypes to validate that the proportions work. Document your grade rules in a table so you can apply them consistently when grading new designs.
This article was written using GrandRanker